Wednesday, August 13, 2014

The Colors of My Art Room Part 2


In my previous post, I showed how I used color coding with my students. I also use color coding to keep track of the 6 different grade levels I teach. I've assigned a color to each grade level.
In recent years, I taught most grades in blocks. I might have 4th graders in the morning and 2nd grade in the afternoon. Seating charts were kept in color coordinated binders by grade level.
Here are the folders that the students use to place their 2-D work in. The labels with the teacher's name and classroom number are on green paper identifying these folders as belonging to 4th grade. Recently I added tabs on the fold. All the tabs from each class line up. If the tabs don't align, a folder belongs to another class. I can also tell from a distance which grade level a pile of folders belong to.
Maybe you've noticed that my cupboards and shelves don't match. For some reason when the art room was built, there were no built in shelves in the room except for the wall where the 4 sinks are located. All other built ins are in the storage rooms. As a result, I've collected, gathered, bought and created the storage within the Art room. These low shelves hold folders while they're not in use. The cupboards are for 3-D and finished projects or for folders not in use. I use the drawers to store lesson examples and extras for new or absent students.
I found this solution online last year. Color coordinating binder clips with each teacher's name on them identifying a shelf for a set of folders. There's a limited amount of shelves and my schedule changes each quarter. The clips get rotated back and forth following the schedule.
My schedule for quarters 2 and 4 last year. I place several of these in strategic locations around the art room.
Small binder clips labeled with each room number on the drying rack.
Vocabulary lists by grade level hung on cabinet doors. I used contact paper to attach a 2'' wide strip of galvanized metal to use magnets to hang the lists.
 
A few years ago one of our lead teachers taught a workshop showing us how she uses vocabulary posters to illustrate the various concepts we teach.  It's a pretty hefty stack of images.
I labeled each one on the back by color and the quarter when that concept is taught based on our pacing guides. I can drop an arm full of posters and get them straightened out in no time. I speak from experience...

There you have it. Organization for 6 grade levels at a glance! I have more years of teaching ahead of me. Got ideas of your own to share?

Marissa


Saturday, August 9, 2014

The Colors of My Art Room Part 1

Arizona starts their school year earlier than most. We just finished our first week back that started on Wed. The first class meeting with students is usually taken up with going over the Art room discipline plan. The Art room rules, the positive rewards and consequences are based on Harry Wong's book, The First Days of School. My Partner In Crime at HandsHeadnHeart wrote a post on a great, recent presentation by Harry Wong sponsored by our school district. 

Today I'm focusing on how I've organized my room to optimize classroom management and discipline. I'm visual and I have a tendency to live among piles. My goal is to have as many visual cues as possible. 

First things first, how to get 20-34 students into my room and have them find their seat in an orderly manner.
There are nine tables in my room seating 4 students each. I've a signed a color to each table with a crayon in that color hanging over head. (Nice use of those dollar store, piggy bank, crayons except that I had to spray paint a few to have the right colors).
Each table has an uppercase A, B, C, D painted with their assigned color on each corner. (I stress uppercase letters because the lower case b and d caused confusion in the past. Live and learn). While I'm learning student's names I can call on the A's to do one task, the B's another without constantly having to refer to a seating chart. The colors and the lines painted on the tables are also used as tools to call tables to get materials or line up. Art concepts like primary, secondary, warm, cool colors can be used to emphasize a lesson.
I made a set of cards for each table and laminated them so they can be used year after year. While the class is lined up outside the room, I go over the procedure for the cards and matching them to a seat at each table. As the students walk up to the art room door, I hand them each a card alternating between boys and girls. My goal is to have a balance of boys and girls at each table. A few cards are placed in the bottom of the stack if I see students who need to be kept separate from each other.
Our class lists change a lot from the 1st to the second week of school due to no shows and new students registered. I follow the same procedure with the cards at the second class meeting. While the students work on an assignment,  I go around and write their names on my seating chart. The seating chart reads like a map of the room. Attendance and grades are kept here. The lines 1-18 are used to write in the date and the lesson worked on.
 
 I use folders for the students to put their 2-D work in. One color matching folder per table with the teachers' name and room number at the top is used by all students at that table. The first set of laminated folders I made lasted my first 15 years of teaching. I recently made new sets adding a copy of the Art room rules and the procedure for writing their names on their papers.
I've gone so far as to spray paint baking tins for crayons and assigned them to each table. Same for pencils. When something is found or missing, it's easier to trace it back to one table rather than inquiring at nine. Assigning items limits choices and therefore, possible discussion, saving time. 

There's nothing like using our time for getting messy and getting down to creating masterpieces!
I also use color coding to make organizing easier for me. I'll share that in Part 2.
Marissa


Tuesday, August 5, 2014

Art Teacher Tuesday-Managing the Art Room

Year 19 of art teaching begins in a matter of a day and a few hours. This weeks' blog post focuses on classroom management. I have the flow of my art room well oiled but I'm still working on the flow of these weekly blog posts. This is one of my busiest times of the year getting ready to teach and preparing The Chick for her start of a new school year. All the while vending and attending art workshops at Art Unraveled, a yearly event of a week full of art workshops.
I'll be away from my school site tomorrow attending one last class but will be in place, camera ready on Wed. to take pics of some of the management tools that I've found helpful in running our art program.

Marissa

Thursday, July 31, 2014

Get Out and Take It In

This week on Art Teacher Tuesday... Yes, I know it's Thursday, can you tell back-to-school craziness has set in?
For those months with a 5th Tuesday, my Partner In Crime at HandsHeadnHeart, and I are spotlighting art exhibits and/or teacher resources.
We teach art, we show our students art but do we go out and look at art ourselves?
 
 There are two group shows currently on view in downtown Phoenix that I'm excited to share. These shows are special to me because I'm exhibiting my work for the first time in 12 years. My daughter, The Chick, is exhibiting for the very first time!
First up, the "Expressively Frida" exhibit at the Burton Barr Public Library. This is a juried exhibit organized by the Phoenix Fridas artist cooperative. Artists were invited to submit work inspired by Mexican artist, Frida Kahlo. The selected pieces hang among the work of the 10 Phoenix Frida artists.
The work varies between pieces recognizable from Frida Kahlo's works to art works inspired by Frida's story, her imagery and/or her image.
Kyllan Maney
 
 Cory Celaya
 Carmen Guerrero
 Emily Costello, detail
My piece, "Frida and the Blooming Watermelons," detail.
It's hard to miss Green Haus on Roosevelt Row. Besides the green painted building, there's three of these beautiful birds painted the height of the exterior of the building.
Currently on view is an exhibit titled "Generations." It pairs artists with their artistic offspring.
Artists, Bill Hemphill, his son, and his father.
Kori Miraglia
JaJure
Kyllan Maney
Collaborative piece by Kyllan Maney and her daughter.
Mine above, "Night Blooming Cereus," The Chick's photograph below. The pieces are beautiful but my photos don't do them justice. Can a poster make you cry? Does a picture in a book make your jaw drop? Go see and experience art in person!
Both exhibits are hosting closing receptions during Phoenix First Friday, August 1st.
What kind of art events are there in your community?
Marissa

Tuesday, July 22, 2014

Welcome to Art Teacher Tuesday!


As you can see, it's been awhile since I've posted. I've been stuck trying to figure out the direction to take this blog. I need to F-O-C-U-S. Focus is a juggling act. Am I super mom today? Or art teacher? Or artist? All are an important part of me. A solution was in order. What did "we" come up with?  Art Teacher Tuesday! (Cheesy???? Perhaps, but I'm an elementary art teacher, "Cheesy" is part of my job description).

Summer break is coming to a quick end here in metro Phoenix. Earlier this week, Nancy, my Partner In Crime, and I, met over tacos to plot our blogging adventures. First we did some simple math. Between the two of us we have over 50 years of experience as art educators! Talk about brain picking! In addition, we have several talented colleagues that we look forward to highlighting over the coming school year.

Each Tuesday Nancy and I will be sharing tips on art lessons, classroom management and blogs we might find helpful. We'll also review student art displays and local exhibits.

Today, the 4th Tuesday of the month, we're highlighting our school district office art displays.
Each month art teachers from our district set up 2-D and 3-D displays at our district offices. Anyone entering the main board room encounters two 3-D cases filled with the best of our students' art work. Starting out this school year, we get an overview of Ms. H's K-5 student work from last school year.
Let's start with pancakes. Who doesn't like pancakes? Can you imagine an art teacher telling her students they're going to make pancakes in art class? Ms. H did but instead of batter they used earthen clay in the Kinder classes. Little hands rolled and pressed clay. Found objects were used to create designs. Lastly, the flat pieces were shaped by molding around little knees. After firing, the clay pieces were painted with watercolor highlighting the wonderful textures of the designs.
From pressing to pinching. It's always fun to get students to pinch without them getting into any trouble. First graders made nests from pinch pots adding sculptural, feathered friends by rolling and pinching their clay.
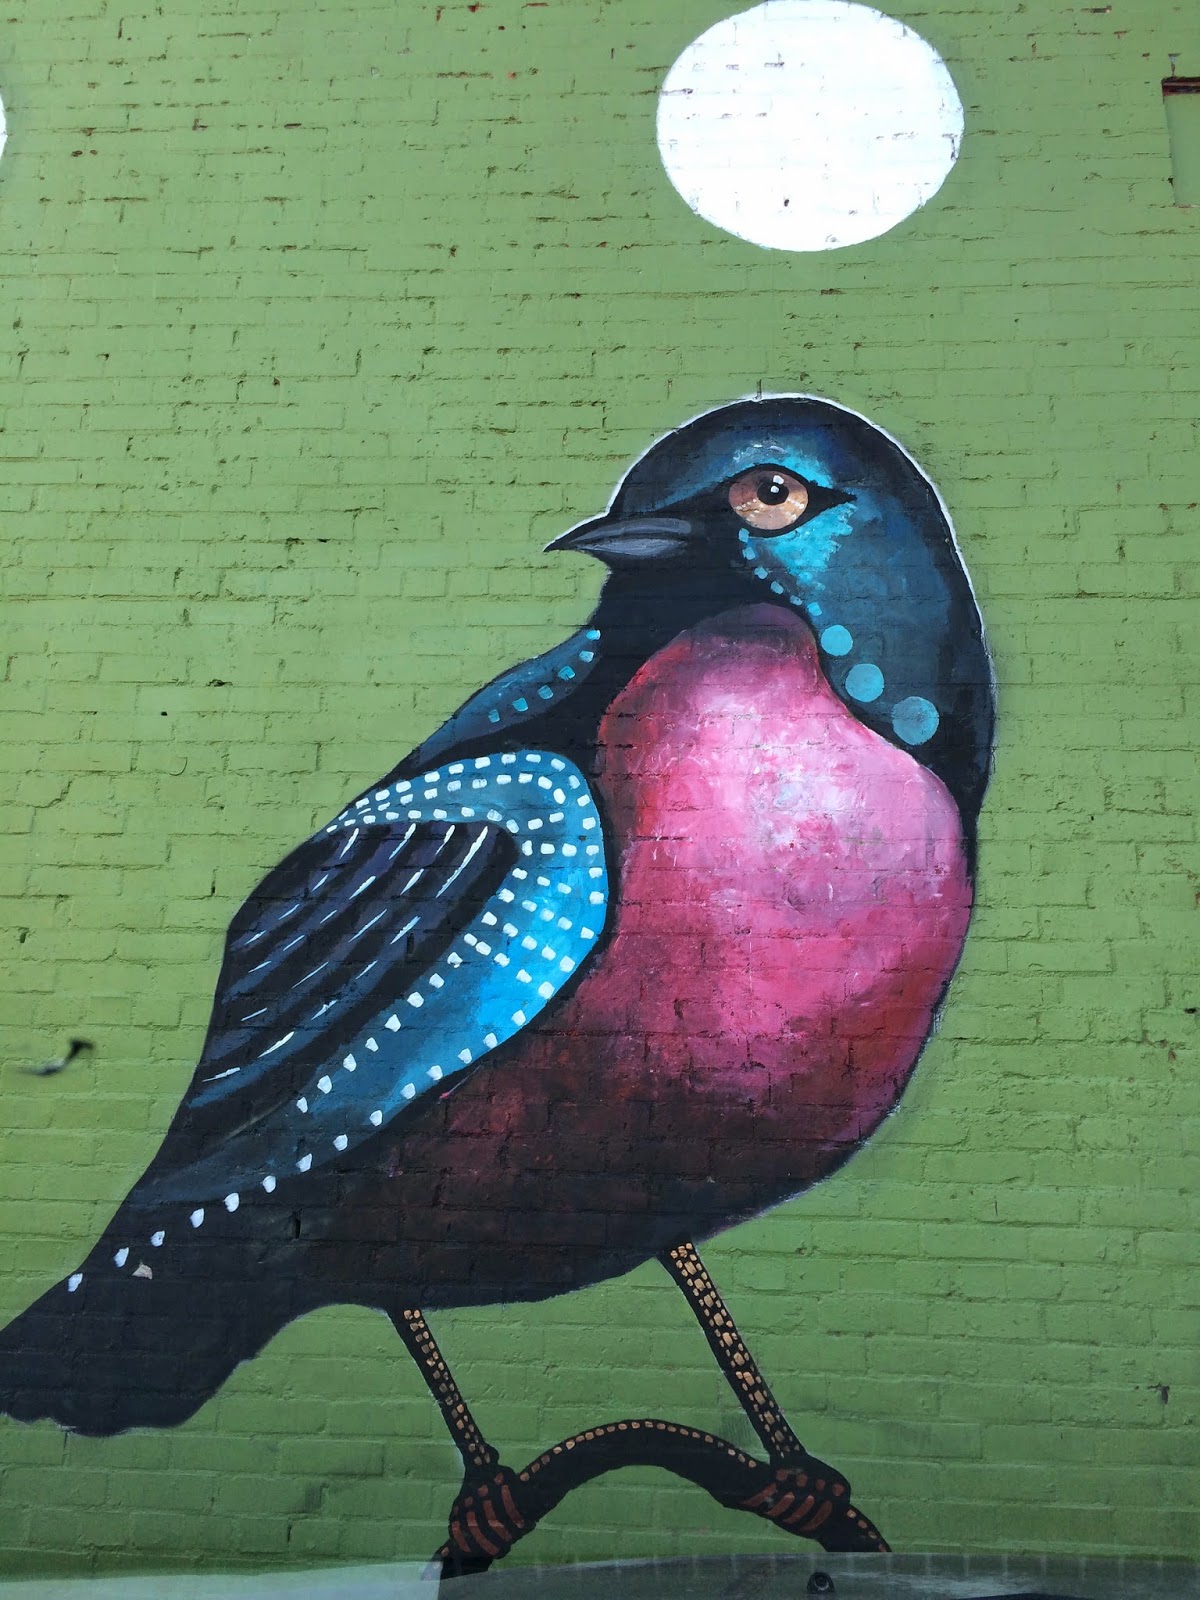
2nd and 3rd graders learned about symmetry and organic shapes then created colorful butterflies. Students used watercolor to paint their winged friends after discovering how to mix tertiary colors. The artists were encouraged to choose a color palette of warm or cool colors. I can picture this beauty visiting my garden!
The perfect pinch pot was the goal for these 2nd grade projects. The students were required to test their skills to score, add slip and press their clay, attaching pieces together to build cupcakes with cherry topped frosting,
 
"Bear" bowls
Ducks
and Penguins were also on the 2nd grade menu!
 
Using traditional clay building techniques, 3rd graders rolled coils to their hearts' content, building  these functional vessels. Usually, the coils would be smoothed over. Here the coils were used as a decorative element.
Rolling pins are a fun tool to use that require skill and muscle. Ms. H's 4th graders used their know-how to roll flat slabs of clay to create these fanciful creatures of the sea. The clay slabs were shaped around balled newspapers. Tails and fins were formed, eyes added and textures pressed creating patterned scales.
Do you get the feeling someone is looking at you? Mosey on over to handsheadnheart, my Partner in Crime's blog to read about the 2-D display at district.

It's been a busy spring and summer. While Tuesdays are reserved for the art teacher in me, I have lots of art and more to share with you.
Marissa

Sunday, March 9, 2014

I Detour For Art Two

 Day Two of Art Detour 26. We hit the ground running and then sort of sputtered towards the afternoon. We sure got in a lot. 
First stop-Coe House


 Hugo Medina at Hugo's Art


Revolver Records-Not exactly new art but lots of memories and cool album cover art.

Eye Lounge


MADE Art Boutique 


515 Gallery-Hands down best quality group show that I saw on Roosevelt Row today.


 Green Haus


 MonOrchid

 Our last stop-The Hive


We re-energized by taking same time to relax in good company at The Hive. Our Art Detour this year was but a drop in the bucket. We didn't make it to Grand Ave. but most of the galleries will have closing receptions on Third Friday.
Thanks for coming along the tour with us!
Marissa